11 Display Deployment Detail
tag: https://github.com/tangx/k8sailor/tree/feat/11-display-deployment-detail
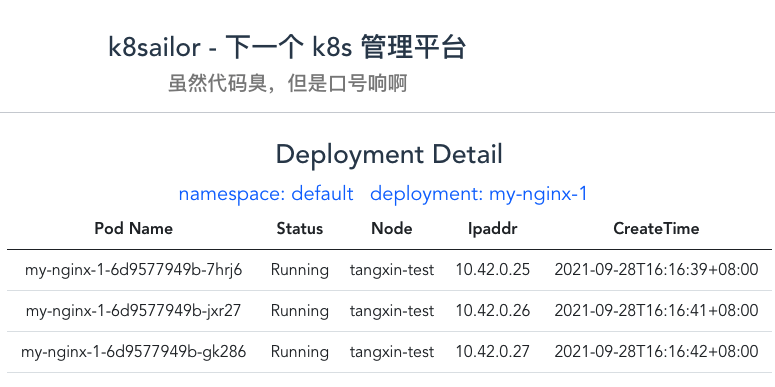
之前在后端已经将详情页的展示接口拆成了 2个
- 其一是根据 name 获取 单个 deployment
/deployments/:name - 其二是根据 deployment name 获取 关联 的 pods 信息
/deployments/:name/pod
页面展示就是两个接口请求与数据展示的简单操作, 和之前 deployment 页面一样, 没什么好说的。
不过, 在遇到第二个、第三个接口出现的时候, 发现之前对于 deployment list 返回的数据结构设计出现了问题。
当时是将 code, error 两个字段直接内嵌到 Deployment 的接口设计之中。
export interface Deployment {
    code: number
    error: string
    data: DeploymentItem[]
}

export interface DeploymentItem {
    images: string[]
    name: string
    namespace: string
    replicas: number
    status: {
        availableReplicas: number
        replicas: number
        unavailableReplicas: number
    }
}
现在发现, 如果需要在对 单 Deployment 和 多 Pod 进行返回的时候, 再重复这样将 code, error 耦合到响应接口里面就额外的冗余了。
因此, 在 /webapp/src/apis/httpc.ts 中单独抽象了一个 根响应接口 HttpcResponse, 包含了 code 和 error 字段。
// HttpcResponse 是 Server 端的基础响应结构体
// 具体的接口响应结果, 需要接口自行实现 HttpcReponse 的继承与 data 字段的覆盖
export interface HttpcResponse {
    code: number
    error: string
    data: Object
}
之后具体的接口响应接口, 都从 HttpcResponse 中衍生, 其行为只需要覆盖 data 字段即可。
// Deployment 定义 Deployment 数据字段
export interface Deployment {
    images: string[]
    name: string
    namespace: string
    replicas: number
    status: {
        availableReplicas: number
        replicas: number
        unavailableReplicas: number
    }
}


// DeploymentListResponse 继承并覆盖 data, 返回 deployment 的列表
export interface DeploymentListResponse extends HttpcResponse {
    data: Deployment[]
}

// DeploymentResponse 继承并覆盖 data, 返回 deployment 的单个字段
export interface DeploymentResponse extends HttpcResponse {
    data: Deployment
}
在 vue3 setup 语法中, 倒入 vue-router 模块, 使用 useRouter() 方法获取到 router API。
就可以很方便的通过 router.currentRouter 获取到相关路由信息了。
// 路由表
const routes = [
    {
        path: "/deployments/:name",
        name: "DeploymentDetail",
        component: () => import('@/components/views/DeploymentDetail.vue')
    }
]
之前在路由表中定义路由信息的时候, 使用了 /deployments/:name 路径参数, 也是在这里的路由中获取。
import { useRouter } from "vue-router";

const router = useRouter()

// 获取 url 中的变量信息
const fetchUrlParams = function () {
  // 获取全路径
  // console.log("fullpath::::",router.currentRoute.value.fullPath);

  // 获取 query 参数
  // console.log("query::::",router.currentRoute.value.query);

  // 获取 路径参数
  // console.log("params::::",router.currentRoute.value.params);

  req.Params.name = router.currentRoute.value.params.name as string
  req.Params.namespace = router.currentRoute.value.query.namespace as string

}